V1SE Wifi Kit installation (Full steps)
JC V1SE Wifi Kit Installation

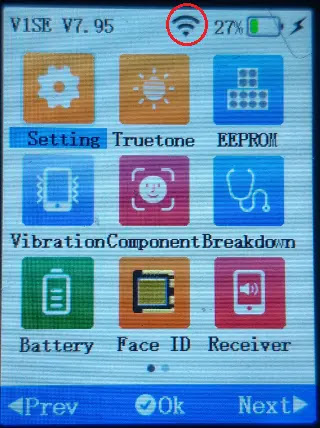
When you upgrade V1SE to new version (V7.95) and your device has no wifi module, then you face with this notification on your device
The V1SE you are using is a non-wifi version, you can colsult the merchant to upgrade the WIFI version.
There is a module makes V1SE to able to connect wifi networks. When you want to use non removal dot projector flexes you need a network connection on V1SE to activate dot projector flex.
You can get free the kit is on the image below from your merchant whom you buy v1se from.

I can't say it's very easy to install, you need good soldering ability to install it!
Hardware Changes
To disassamble the V1Se;
- Remove the battery cover
- Remove the battery
- Unscrew the 4 screws on the back of the device.
- Unplug back cover of device
- Take of the board, be carefull of the LCD screen, and its flex
- Unplug LCD and cut the sponge like image below

- use two sided tape to stick wifi kit to main board

- Wire G tp on the module to Pt1 on the board and wire V tp on the module to Pt2 on the board like image below
- Wire Pt3 on the module to 3-4 pins of chip on the board and pt4 on the module to 5-6 pins of the chip on the board

- find U14 marked chip area and short its pin 1 to pin2

- Stick the antenna on the place like on the image below
- Plug the cable of antenna
- Put the lcd back
- Put the main board back and hide the antenna cable under the board
- Put the back cover, screw the screws put back battery and cover, hardware is done!

Software Changes
Software upgrade is easy
- Format a flash disk to FAT32 file system.
- Download this file and extract it to root of flash disk
- Put flash disk to V1SE Usb host (upside of device)
- Goto Menu About, Upgarade and Firmware upgrade, wait upgrade to finish, be sure your device connectted to charger

Then your device ready to connect.
V1SE Setting up wifi connection
Run JCIDRepair software on your pc, go to repair fitting tab, the software should recognize your device, you can see Device: V1SE Handheld Programmer and device SN. Click Connect, if is there any upgrade your device will be upgraded, wait until upgrade completted. and Click V1SE Wifi Setting. Find your Access Point on the list and enter your AP password to connect, if your AP is hidden you can type AP name and password manually

and your wifi connection done!


Comments
Post a Comment